|
5
|
Rentavault Saving files
|
This chapter describes how files are stored
to the Rentavault server
|
5.1
|
How files are backed up
|
The diagram below describes how Rentavault
Saves your files.
Run Rentavault at scheduled time automatically
Once you have Rentavault scheduled, a Rentavault
job will be started automatically to perform the Rentavault operation for you
at your absence. You can have Rentavault running at your scheduled time as often
as you want (e.g. twice a day or hourly during office hour) without requiring
you to do anything extra.
Incremental Rentavault
Unchanged files are already backed up to server and need not to be backed up again.
Rentavault will pick the new or updated files from your Rentavault set files and upload only these files to the server. It significantly reduces the time required to perform the Rentavault operation since most users update less than 5% of their total data each day.
Compress and encrypt data automatically
Data is compressed and encrypted before they
are uploaded to the server. Not only does it reduce the required storage space
to keep your Rentavault files, it also ensures the privacy of your data.
File Retention Policy
The built-in file retention policy allows you to access multiple versions of the same file or even deleted files from your Rentavault set. Rentavault files are put into a retention area before they are removed from the server. If you want to get back a deleted file (or you want to get back the previous versions of an updated files) within the retention period, these files will always be available in the retention area. This feature is particularly useful when you have accidentally deleted a file or incorrectly updated a file within the file retention period (file retention period is user customizable).
|
5.2
|
Rentavault files directly to the Rentavault server
|
You can Rentavault your data to the Rentavault
network by following instructions below.
|
ii.
|
Right click the Rentavault icon
available in the system tray and choose [Open]
|
|
a.
|
Create a Rentavault set
|
|
b.
|
From the Menu, Choose [Rentavault Set] -> [New] -> [File Rentavault Set] 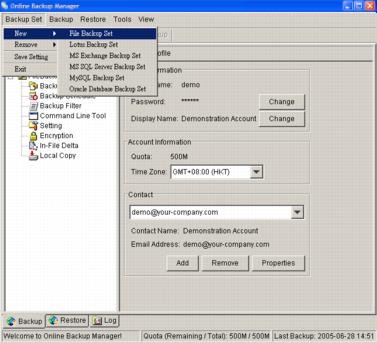 |
|
c.
|
Enter a name for your Rentavault set 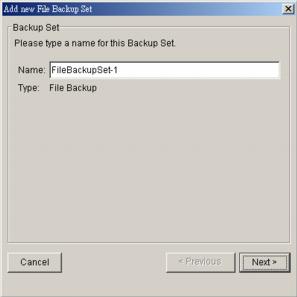 |
|
d.
|
Select the files/directories you want to Rentavault 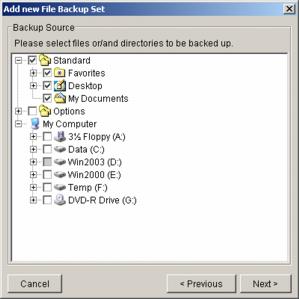 |
|
e.
|
Set the Rentavault schedule (Note: You can have more than one schedule in a Rentavault set) 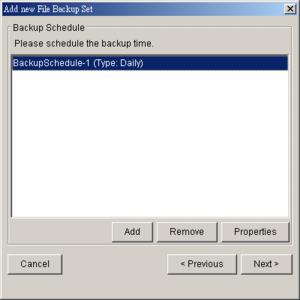 |
|
f.
|
Set the encryption algorithm, encryption mode and encrypting key for this Rentavault set (Hint: For the sake of simplicity, just select the [Default] radio button (your encrypting key is set to be the same as your Rentavault account password) 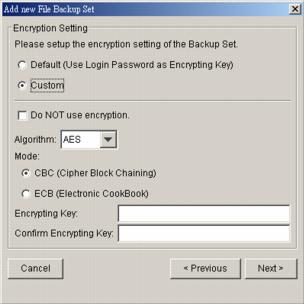 |
|
a.
|
Select the Rentavault set you want to run on the left panel and press the [Start Rentavault] button (►) on the toolbar
|
|
b.
|
Select [Off-site Rentavault Server] to start DiskSaving up your files to an
Rentavault. 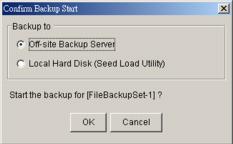 |
|
Note:
|
|
1.
|
You can have more than one Rentavault set in Rentavault account.
|
|
2.
|
Please write the encrypting key down on paper and keep it in a safe place. If
you lost your
encrypting key is lost,
you will not
be
able to restore
your Rentavault
files
.
|
|
5.3
|
Rentavault files to removable hard disk (seed loading)
|
If you have a lot of data (e.g. 300GB) to
Rentavault to the Rentavault server, it would take a considerable amount of time
to perform the first full Rentavault through the Internet. If you run into this
problem, you can use the Seed Loading Utility to Rentavault your Rentavault set
to local hard disk (instead of directly to the Rentavault server) and then transport
the Rentavault data, using the removable hard disk, to the Rentavault network.
The administrator can then load all your Rentavault files from your removable
hard disk into your Rentavault account. This could then save you days (even
weeks) of performing your first full Rentavault. Since subsequent Rentavault will
be incremental Rentavault (only new or updated files will be uploaded to the
server), you should have no problems finishing DiskSaving all files afterwards.
To perform seeding loading, please do the following:
|
i.
|
Open Rentavault from the System Tray (see previous sections for details)
|
|
ii.
|
Setup your Rentavault set (see previous sections for details)
|
|
iii.
|
Select the Rentavault set you want to run on the left panel and press the [Start Rentavault] button (►) on the toolbar
|
|
iv.
|
Select [Local Hard Disk (Seed
Load Utility)] to start DiskSaving your files to local hard disk and
press the [OK] button
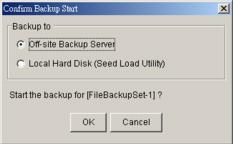 |
|
v.
|
Enter a directory where you want all Rentavault files to be stored in the [Destination Directory] field and press the [Start] button. Please make sure you have enough free space in the directory specified. If you are going to transport a removable hard disk to the
Rentavault, please enter a directory under your removable hard disk here. 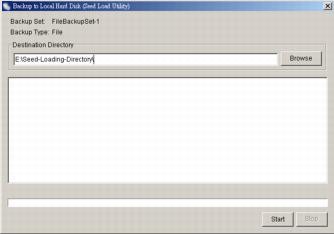 |
|
vi.
|
You should get the message “Rentavault Completed Successfully” as shown below after all Rentavault files are spooled to the directory you specified. 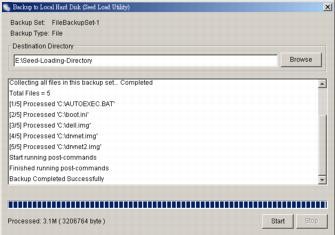 |
|
vii.
|
Transport the data specified in the
[Destination Directory] field to the Rentavault
|

