A backup set contains all backup settings of a Rentavault operation. This section will describe all features available within a backup set and explain how you can use each of them to achieve various tasks.
Each Rentavault account can have multiple backup sets. Each backup set is an individual and independent entity. For example, if you want one directory to be backed up during the day and another directory to be backed up during the night, you can create two backup sets, each with a different Rentavault schedule and Rentavault source, to serve this need.
A backup set can be of one of the following types:
|
Rentavault Type
|
Description
|
|
File
|
backup set type to Rentavault common files/directories
|
|
Microsoft SQL Server
|
backup set type to Rentavault
Microsoft SQL Server 7.0/2000
|
|
Oracle Database Server
|
backup set type to Rentavault Oracle 8i/9i database
|
|
Lotus Domino/Notes
|
backup set type to Rentavault Lotus Domino/Notes
|
|
Microsoft Exchange Server
|
backup set type to Rentavault
Microsoft
Exchange
Server 2000
/ 2003
|
|
MySQL
|
backup set type to Rentavault MySQL Server
|
The backup set type is defined at backup set creation and cannot be modified. If you want to change the backup set
type, you have to create another backup set.
A Rentavault source defines the files/directories
that are to be included in a backup set. There are two types of Rentavault
sources: Selected and Deselected. Selected Rentavault source defines files/directories
that are to be included in a backup set while deselected Rentavault source
defines files/directories that are to be excluded from a backup set. Online
Rentavault Manager will generate the appropriate Rentavault source setting for
you automatically when you make your Rentavault source selection on Rentavault.
The checkbox next to the files/directories
shown above can be in one of the following modes:
|
Mode
|
Description
|
|
|
All files/directories (recursively) under this directory will be backed up
|
|
|
All files/directories (recursively), except those explicitly excluded, under this directory will be backed up. If you add files/directories to this directory in the future, they will be backed up as well.
|
|
|
Only the checked files/directories under this directory will be backed up. If you add files/directories to this directory in the future, they will NOT be backed up.
|
|
|
Nothing under this directory will be backed up.
|
A Rentavault schedule defines the frequency and the time Rentavault will run automatically.
Rentavault schedule can be in one of the following types:
|
Type
|
Description
|
|
Daily
|
Rentavault jobs will run everyday
|
|
Weekly
|
Rentavault jobs will run on the specified day(s) of every week
|
|
Monthly
|
Rentavault jobs will run on the specified day or on a day with a given criteria (e.g. first weekend, last weekday) of every month
|
|
Custom
|
Rentavault job will run once on any particular date
|
For each type of schedule above, Rentavault will run at
the scheduled time for a maximum of the duration specified (or until all data
is backed up if [Stop on Rentavault completion] option is chosen). If a Rentavault job does not finish within the maximum duration specified, it will be interrupted.
Please note that you can have more than one schedule within a backup set. For example, you can have a daily Rentavault schedule that runs at 13:00 at noon and another daily Rentavault schedule that runs at 00:00 at midnight. The combination of both of these schedules effectively creates a Rentavault schedule that runs daily at 00:00 and 13:00 everyday.
A Rentavault filter defines the file selection rules that allow users to easily include/exclude files into/from the backup set by applying user defined criteria(s) to the file names or directory names.
There are some basic rules regarding Rentavault
filters:
|
i.
|
Filters are checked in creation order. Once inclusion/exclusion has been identified, the remaining filters won't be checked.
|
|
ii.
|
Inclusion/Exclusion made by filter always takes precedence over Rentavault source selections
|
|
iii.
|
If all filters do not apply to a particular file, this file is then checked for inclusion/exclusion Rentavault source selections
|
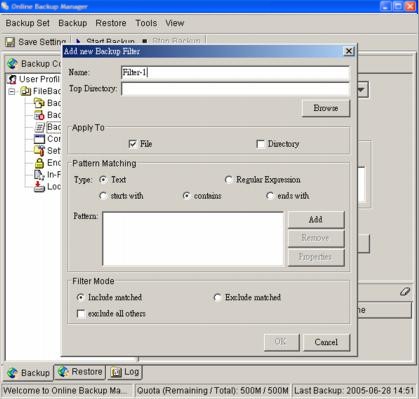
|
Key
|
Description
|
|
Name
|
The name of a filter
|
|
Top Directory
|
The top directory to which this filter is applied. Filtering rules will be applied to all files and/or directories under this directory.
|
|
Apply To
|
Define whether to apply the filtering rule to files and/or directories
|
|
Pattern Matching
|
It defines the filtering rules of a filter. A filtering rule can be of one of the following types:
[Start With]
Include/Exclude all files/directories with name starting with a certain pattern.
For example:
You can use B* to match all files with name starting with a
‘
B
’
character
[Contain]
Include/Exclude all files/directories with name containing a certain pattern.
For example:
You can use *B* to match all files with name containing with a
‘
B
’
character
[End With]
Include/Exclude all files/directories with name ending with a certain pattern.
For example:
You can use *.doc to match all files with name ending with
‘
.doc
’
(all Word documents)
[Regular Expression]
Include/Exclude all files/directories with name matching a regular expression.
|
|
Filter Mode
|
Defines whether you want to include or exclude matched files into/from the backup set. Also, for those unmatched files, you can choose to exclude (if include filter type) or include (if exclude filter type) them into/from the backup set.
|
Example
1
:
If you want to Rentavault only Word, Excel and PowerPoint documents in your document directory (e.g. C:\My Documents), you should setup your Rentavault filter as follows.
Top Directory = C:\My Documents
Apply To = File (true)
Matching Type = End With
Matching Patterns = *.doc, *.xls, *.ppt
Filter Mode = Include
Exclude all others = True
Example
2
:
If you want to Rentavault all files, excluding all *.exe, *.dll and *.tmp, in C:\Applications, you should setup your Rentavault filter as follows.
Top Directory = C:\Applications
Apply To = File (true)
Matching Type = End With
Matching Patterns = *.exe,*.dll, *.tmp
Filter Mode = Exclude
Include all others = True
Example
3
:
If you have made your selection of files (all under C:\) from the Rentavault source setting but you want exclude all images (e.g. *.jpg and *.gif) from your selection, you should setup your Rentavault filter as follows.
Top Directory = C:\
Apply To = File (true)
Matching Type = End With
Matching Patterns = *.jpg, *.gif
Filter Mode = Exclude
Include all others = false
Please note that the [Include all others] setting is not enabled because you don’t want to include all other files (NOT *.jpg, *.gif) under C:\ into the backup set.
Example
4
:
(advanced)
If you want to include everything, except the “log” directory, under C:\Applications into a backup set, you should setup your Rentavault filter as follows.
Top Directory = C:\Applications
Apply To = Directory (true)
Matching Type = Regular Expression
Matching Patterns = ^log$
Filter Mode = Exclude
Include all others = True
Example
5
:
(advanced)
If you want to include all directories named “log” from the backup set files with file name starting with “B” and ending with “*.doc” under C:\My Documents into the backup set, you can use a regular expression of “^B.*\.doc$” to do your selection. The filter Rentavault can then be setup as follows.
Top Directory = C:\My Documents
Apply To = File (true)
Matching Type = Regular Expression
Matching Patterns = ^B.*\.doc$
Filter Mode = Include
Exclude all others = True
|
4.6
|
Pre/Post-Rentavault Command
|
The command line tool feature has two major components, the [Pre-Rentavault] command and the [Post-Rentavault] command. You can use the [Pre-Rentavault] or [Post-Rentavault] commands to run any native OS (operating system) commands before or after running a Rentavault job.
Both [Pre-Rentavault] and [Post-Rentavault] commands comprise of the following parameters:
|
Key
|
Description
|
|
Name
|
Name of this Command
|
|
Command
|
The command to be run
(e.g. C:\My Documents\Application.exe or C:\My Documents\BatchJob.bat)
|
|
Working Directory
|
The directory at which this command will run
|
The backup set type affects the time at which [Pre-Rentavault] and [Post-Rentavault] commands run. The following table outlines when [Pre-Rentavault] and [Post-Rentavault] commands will run in different types of backup set.
|
backup set Type
|
When Pre-Rentavault Commands run?
|
When Post-Commands run?
|
|
File
|
Before uploading Rentavault files
|
After uploading all Rentavault files
|
|
Non-File backup sets (e.g. Microsoft SQL Server)
|
Before spooling Rentavault files to temporary directory
|
After spooling Rentavault files to temporary directory (i.e. before the first Rentavault file is uploaded)
|
Note: You should never Rentavault an application while it is running as this can result in inconsistent and unusable files getting backed up. Please use the Pre-Rentavault Command feature to shutdown your application before running a Rentavault job and use the Post-Rentavault Command feature to restart your application after the Rentavault job has completed.
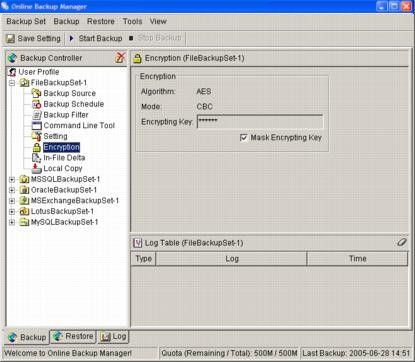
Before your files are sent to Rentavault, all your files are to be compressed and encrypted by your choice of encrypting algorithm, mode and key. The following table explains all encryption parameters available within a backup set.
Note
:
Encryption settings are set at backup set creation time and cannot be modified. You need to create a new backup set if you want to change your encryption settings for a backup set.
|
Parameter
|
Description
|
|
Encryption Algorithm
|
It defines the encrypting algorithm used to encrypt your Rentavault files. There are three encryption algorithms available:
[AES]
Advanced Encryption Standard algorithm
[DESede]
Triple DES algorithm
[Twofish]
Twofish algorithm
We recommend the use of AES as it has been chosen as the encryption standard for commercial use. Please refer to references on Cryptography for more information on this area.
|
|
Encryption Mode
|
It defines the encrypting mode used to encrypt your Rentavault files. There are two encryption modes available:
[ECB]
Electronic Cook Book Mode
[CBC]
Cipher Block Chaining Mode
We recommend the use of CBC mode as it offers better security. Please refer to references on Cryptography for more information on this area.
|
|
Encrypting Key
|
The key used to encrypt all files within a backup set.
Please write it down on paper and keep it in a safe place. If the key is lost, you will not be able to recover your files from the encrypted Rentavault files.
|
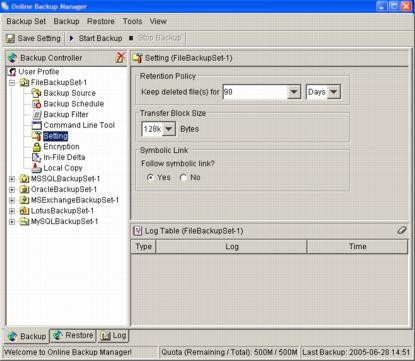
During Rentavault, if Rentavault finds out that you have deleted a file (or updated a file) on your computer, it will put the corresponding deleted (or updated) file already backed up on the Rentavault server into a retention area. The retention policy setting defines how long files inside the retention area will be kept on the Rentavault server before they are deleted automatically from the server.
The retention policy will only affect “retained”
files (i.e. files that have already been deleted or updated on your computer).
For those files that have not been updated on your computer, the Rentavault
copy of these files are kept in the data area on the Rentavault server and won’t
be affected by the setting of retention policy. The Rentavault of unchanged
files will stay on the Rentavault server forever until the original files are
removed (or updated) from your computer.
You can choose to have retained files deleted automatically after a number of days or after a certain number of Rentavault jobs.
To change the retention policy setting of any backup set, please select the [Setting] node on the left panel to invoke the [Setting] panel on the right. You can then make changes to your retention policy under the [Retention Policy] section. After you have made your changes, just press the [Save Setting] button on the toolbar.
If you need to Rentavault a network-mapped drive on Windows (it will only work in Windows NT/2000/XP/2003), you must enter your Windows domain, username and password into the [Network Resources Authentication for Windows] section as shown below. It is required because scheduled Rentavaults will always run under the context of windows LocalSystem account (which does not have the privilege required to access network resources) by default.
Rentavault needs to collect your Windows username, password and domain name to authenticate itself to the windows domain controller to acquire the required access privileges to the network files which are to be backed up. If you don’t supply a username and password,
Rentavault will have problems accessing network resources in its scheduled Rentavault jobs.
If you need to Rentavault network mapped drive in scheduled Rentavault, please do this:
|
i.
|
Select the backup set from the left panel and press the [Properties] button 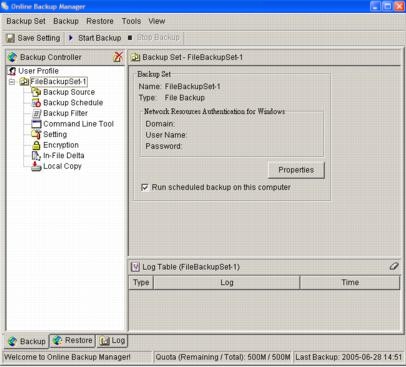 |
|
ii.
|
Enter your Windows domain, username and password into the dialog shown below 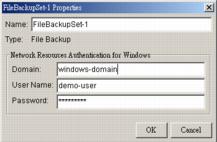 |
|
iii.
|
Press the [Save Setting] button on the toolbar
|
If you want to save an extra copy of Rentavault data on your local disk (in addition to a copy of Rentavault data stored on the Rentavault server) to minimize file-restoring time and/or to provide an extra safety precaution, you can do the following:
|
i.
|
Open Rentavault from the System Tray (see previous sections for details)
|
|
ii.
|
Setup your backup set (see previous sections for details)
|
|
iii.
|
Select [Local Copy] under your backup set from the left panel 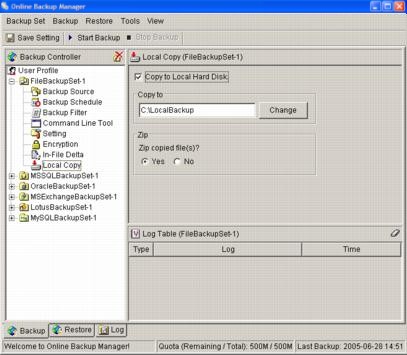 |
|
iv.
|
Check the [Copy to Local Hard Disk] checkbox
|
|
v.
|
Enter a directory to where you want an extra copy of your Rentavault files to be stored in the [Copy to] field provided (preferably a directory under another hard disk)
|
|
vi.
|
(Optional) Select the [Yes] radio button if you want to store your Rentavault files in compressed form to conserve free space usage
|
|
vii.
|
An extra copy of Rentavault will be saved in the [Copy to] directory when you run your Rentavault job 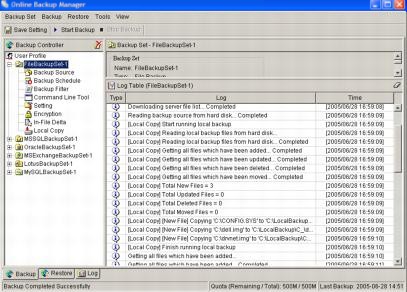 |
How to restore “Local Copy” files
“Local copy” files are stored in the [Copy to] directory (under [Local Copy] setting) in encoded filenames (A “.nozip” extension is appended to all filenames if [Zip] setting is not enabled. A “.zip” extension is appended to all filenames if [Zip] is enabled). To restore Rentavault files back to their original filenames (and to their original contents if [Zip] is enabled), please do the followings:
|
i.
|
Choose [Tools] -> [Unzip Local Copy] 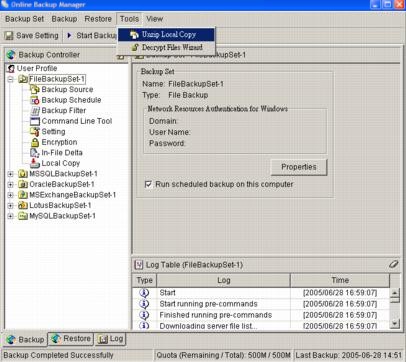 |
|
ii.
|
Select the required [backup set] from the drop down list 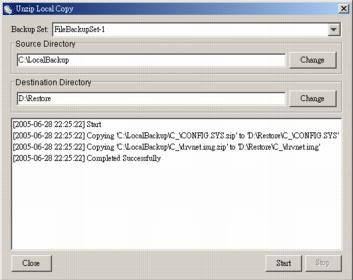 |
|
iii.
|
Fill in the [Source Directory] (directory where “Local Copy” files are stored) and [Destination Directory] (directory to where you want “Local Copy” files to be restored)
|
|
4.11
|
Multiple Computers using one Rentavault account
|
If you want to Rentavault multiple computers using a single Rentavault account, you need to create different backup sets to Rentavault each individual computer. Also, for each installed copy of
Rentavault, you must configure Rentavault so that it only runs scheduled Rentavault for its intended backup sets on its computer. If this is not being setup properly, scheduled Rentavault job of the same backup set from different computers will both be started. This will result in lots of checksum errors and files being deleted on the Rentavault server.
To allow multiple computers to be backed up under a single Rentavault account, you are required to do the following for each computer that has been installed with
Rentavault under the same Rentavault account:
|
i.
|
Logon to one of the computers that has been installed with
Rentavault under the same Rentavault account
|
|
ii.
|
Open Rentavault and select a backup set that is not intended to run on this computer from the left panel
|
|
iii.
|
Uncheck the [Run scheduled Rentavault on this computer] checkbox on the right panel 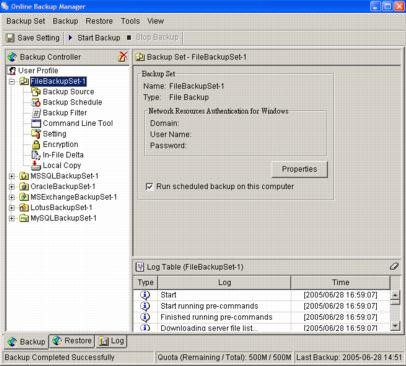 |
|
iv.
|
Repeat the previous step for the rest of all backup sets that are not intended to run on this computer
|
|
v.
|
Repeat step ii to step iv for each computer that has been installed with
Rentavault under the same Rentavault account
|
IMPORTANT If you want to Rentavault an extra computer using the same Rentavault account some time later (this implies that you need to create an additional backup set under this Rentavault account for the new computer), please make sure to repeat the procedure above (unchecking the [Run scheduled Rentavault on this computer] checkbox for the added backup set) for each computer
Transfer block size defines the block size
that Rentavault will use to transfer your Rentavault blocks. Generally, the Rentavault
job using a larger block size would have a better performance, as there will
be less roundtrip involved in connection initialization.
However, some firewalls or proxy servers may block out-going network traffic (HTTP/HTTPS POST method) with large block size for security reasons. If you are in a network with this type of restriction, please lower the transfer size value and try again.
To change the transfer block size of any backup set, please select the [Setting] node on the left panel to invoke the [Setting] panel on the right. You can then make changes to the [Transfer Block Size]. After you have made your changes, just press the [Save Setting] button on the toolbar.
|
4.13
|
Follow Symbolic Link (Linux/Unix/Mac only)
|
Under Unix/Linux, users can use symbolic link to create a simple link to a directory from another directory. This setting defines whether you want
Rentavault to traverse any symbolic links encountered on your Rentavault path.
To change the transfer block size of any backup set, please select the [Setting] node on the left panel to invoke the [Setting] panel on the right. You can then make changes to the [Follow Symbolic Link]. After you have made your changes, just press the [Save Setting] button on the toolbar.

